Scene Graph
The objectives of this TP are:
- Understand the Scene Graph
- Model a human skeleton
- Do a basic animation
Scene Graph
In the previous TP, we created and modelled our 3D pyramid mesh manually by specifying the vertices. Then, we added the pyramid to our 3D viewer. However, to model multiple objects and make a more complex scene, we are going to use Scene Graphs. A Scene Graph is essentially a hierarchical tree where each node represents an object or a group of objects in the scene, and its position and orientation are defined with respect to its parent node.
For example, let's consider a human skeleton in a scene. The scene graph for the human skeleton would have the root node as the base of the skeleton, with child nodes for each bone segment, such as the pelvis, spine, arms, and legs. Each bone segment would then have child nodes for each joint, such as the shoulder, elbow, and wrist joints in the arm. Each joint would then have a child node for the corresponding bone segment, such as the upper arm or forearm.
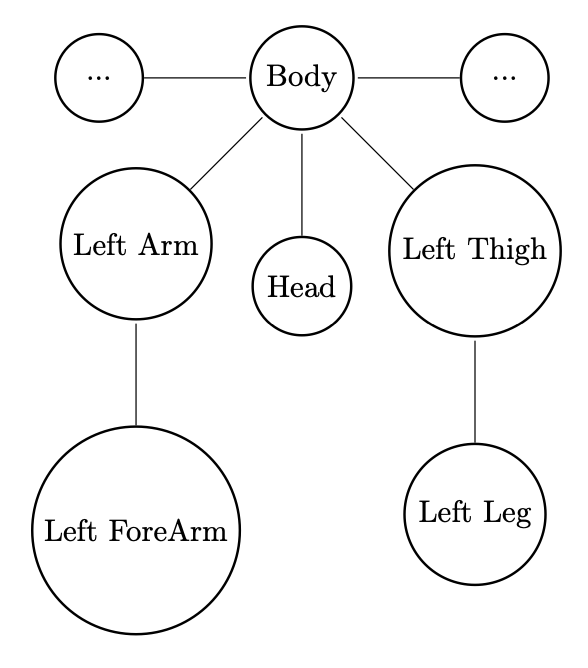 Scene Graph: Human Skeleton
The advantage of using a scene graph is that it provides an efficient way to manage the transformation of objects in a scene. Instead of applying transformations to each object individually, the transformations can be applied to the nodes in the scene graph, and the transformations will be propagated down to all the child nodes. This makes it easier to manipulate and animate the objects in the scene.
Model, View and Projection
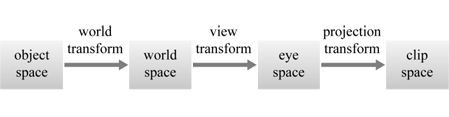
Model view projection (MVP) is a commonly used technique in computer graphics to transform objects in a scene from their object coordinates to clip coordinates, where they can be processed for depth testing and clipping against the view frustum. Scene graphs, which are hierarchical structures used to represent objects in a scene and their spatial relationships, often require the use of MVP to correctly render the objects in the scene.
 Spaces in ther Vertex Shader
In the previous TP, we sent the view and projection matrices to our shaders as uniforms for our 3D pyramid. For this TP, we are also going send our model matrix as well. To do this,
- Create model uniform in your vertex shader
- Calculate the gl_Position of the vertex using the
projection * view * model * vec4(position, 1)
Modeling Human Skeleton
We are going to create a Scene Graph for the human skeleton. Note that we have an additional class in our called Node which can be populated with children nodes and also meshes.
For example, the node for left arm can contain nodes for left upper arm(which can be modeled with the mesh of a cylinder) and left forearm(which will contain more nodes for palm and fingers).
Note that the skeleton has been refactored with various Shape classes such Cylinder, Triangle and Pyramid all modeled using the concepts seen during the previous TPs.
Hierarchical transformations : https://graphicscompendium.com/opengl/13-hierarchical-modeling
Animation
Try to change the translate or values of the skeleton you created to create an animation such as clapping, bending, etcetera.
Bonus: Keyframe Animation
Keyframe animation is a widely used technique to describe animations, by which the animator or designer of the animation specifies the position of the animated object for specific frames, and lets the machine interpolate between them for any other times than those specified. The specified object poses are called key poses. Thus, you can implement the animation of clapping using just two key poses - one with hands in contact and other with hands apart.
Bonus: Model Loading
Instead of modeling your skeleton with pyramids and cylinders. You can import a mesh directly using Assimp. For this instead of adding a Shape inside your node, you could implement a Mesh class which could be either a Shape or a loaded mesh(such as an obj or fbx 3D model). Note that some 3D models(such as fbx) might include keyframed animation data. You can also re-direct pre-defined animation on a mesh using Mixamo.
